Monday, August 31, 2009

Install Windows 2003 on Sun Blade X6250

In this post, i will show you some screenshot to complement what already documented in this link.

According to the Sun document, there are 3 ways for us to load additional SCSI driver and there are floppy local, floppy remote and floppy image. Here i will use floppy image as physical floppy is getting extinct nowadays. You can easily obtain this floppy image from Sun download website. or you can download from this link, which is from module 3.0. Please note if the download link is not working, just leave a comment and i will fix it.

According to the Sun document, you need to have ILOM in order to use floppy image, if you still have ELOM, you should upgrade to ILOM. Once you are in ILOM, to redirect into floppy image is straight forward. From Sun ILOM menu toolbar, just go to Devices and select Floppy Image as shown. Things to take note here is this step must be performed before you boot from your Windows installation CD.


From the popup windows, select where is your floppy image and after you click open, the floppy drive will be redirected to this floppy image and you can see the floppy image at the bottom right corner is no longer greyed out.


You can proceed to boot the system from Windows installation CD and follow the steps listed on the Sun document to proceed.

Tuesday, June 9, 2009

Sun Storage 7210: Default router setting using CLI

If you happen to be like me, where using GUI to change the default router doesn't seems to work, then you have to fall back to use CLI.
There are few ways to access CLI. Firstly, if you still able to connect to the machine using the IP network, using putty is the easiest one. If you can't, you might need to use serial connection or net management connection. (For net management connection, you must have DHCP server and you need to identify the IP address assigned by your DHCP server)

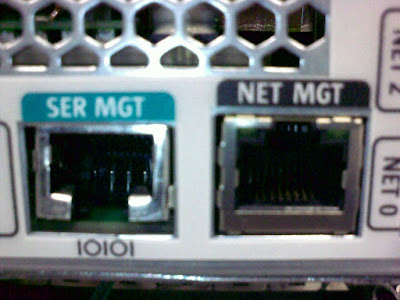
Serial management and network management port

To use serial connection, you need to get a normal ethernet cable and plug it into the converter provided as shown below.
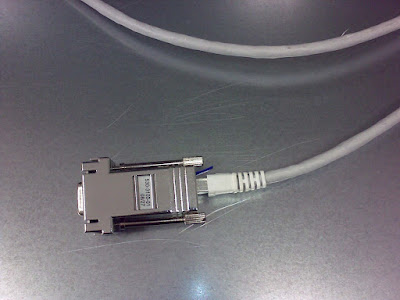
Serial converter

If you are running windows, open your hyperterminal program and choose the correct interface port (Usually is COM1) and set the setting as shown:
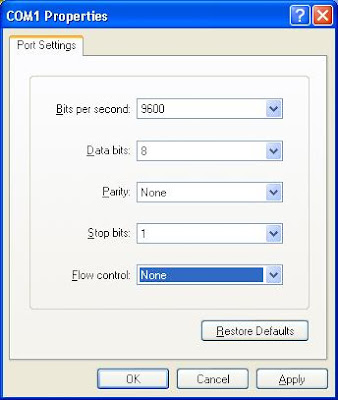
COM port settings


Once you in the terminal, it will prompt you for user name and password. If it is not a console login as shown below

UM7210 console login:

Then you might need to type this to go into console:

start /SP/console

Type y when prompt with this:

Are you sure you want to start /SP/console (y/n)?

Then you will be prompted by the console login.

Once you login, type the following command to go to the routing service:

UM7210:> configuration
UM7210:configuration> services
UM7210:configuration services> routing

Create a new routing by issue the following command

UM7210:configuration services routing> create
UM7210:configuration services route (uncommitted)> set gateway=xxx.yyy.zzz.1
gateway = xxx.yyy.zzz.1 (uncommitted)
UM7210:configuration services route (uncommitted)> set interface=nge0 //depends on which interface used
interface = nge0 (uncommitted)
UM7210:configuration services route (uncommitted)> set family=IPv4
family = IPv4 (uncommitted)
UM7210:configuration services route (uncommitted)> commit
error: cannot create route: must specify "destination" property
UM7210:configuration services route (uncommitted)> set destination=0.0.0.0
destination = 0.0.0.0 (uncommitted)
UM7210:configuration services route (uncommitted)> set mask=0
mask = 0 (uncommitted)
UM7210:configuration services route (uncommitted)> commit

After commit the changes, you can use this command to verify your default routing configuration

UM7210:configuration services routing> list
ROUTE DESTINATION GATEWAY INTERFACE TYPE
route-000 0.0.0.0/0 xxx.yyy.zzz.1 nge0 static
route-001 ...

When finish, just type done all the way.

Sunday, May 3, 2009

Why Qlogic CTRL-Q doesn't show up when i boot my SUN x6250

If you also encounter this problem, problem most likely lie on your BIOS setting.
  1. Go into your BIOS menu, press F2 while system is power on.
  2. Go to Boot -> Boot Settings Configuration
  3. And change the EM0 FUN0 OPTION ROM to enable (I have doubt on why there is FUN0 to FUN7 and i only need to enable FUN0, search internet but can't seems to find any explanation, if you know please post on the comments. However, i do know the Qlogic card plug at EM x.0 where x is the slot number)
  4. Finally reboot and you should be able to see the CTRL-Q
Enable EM0 FUN0 OPTION ROM

Can see CTRL-Q

Sunday, April 19, 2009

ELOM to ILOM for Sun Blade x6250

First of all, you need to download necessary files for this upgrade. Go to this link and look for sun blade x6250 entry. At the time of this writing, the latest firmware version is 2.0.4. After you downloaded the file, extract it out and look for this folder "Elom to Ilom". There are 2 important files inside:
  • Telom_x6250-053_040.ROM - Traditional version of ILOM
  • 6250i203.bin - ILOM image file
According to SUN documentation, you should upgrade your server module to the traditional version of ELOM before migrating it to ILOM.

Initially i like to do this upgrade through web GUI but it always give me the page error when i click the upgrade firmware button. Give up on web GUI, i turn to using command line and surprisingly, is not as hard as i thought.

For command line interface, the extra step you need to do is to prepare TFTP server if you don't have one. For my case, i use SolarWinds Free TFTP server to do it. After finish setup the TFTP server, just copy the 2 files mentioned above to the directory where you put it as root directory on your TFTP server.

The next step is to login to the command line of your server module and execute the following steps:
  • cd /SP/TftpUpdate
  • set ServerIP=xxx.xxx.xxx.xxx (your TFTP IP address)
  • set FileName=Telom_x6250-053_040.ROM (the traditional ELOM)
  • show (optional: just to make sure you provide correct information)
  • set Update=action (and the update process begins)
Below shows the screen capture for the update process. Need to wait for couple of minutes before the server module up again.


The steps taken to update to ILOM are similar to steps taken to update to traditional version of ELOM mentioned above.

The video clip below shows what happen to the sun blade x6250 while updating.